Tutorial
Getting started
To understand how is strutured the system take a look on their website.
Introducing your own controler
To develop your own controler, Acstec has provided a software development kit. Be aware to take the last one (3.0), you will also need to configure your eclipse to use the good compiler. Note that the website is not updated and most of the links are dead !
All is already configured on the Pelican, just create a copy of the working version with a different name.
The Pelican use the following architecture with an onboard computer and 2 processor.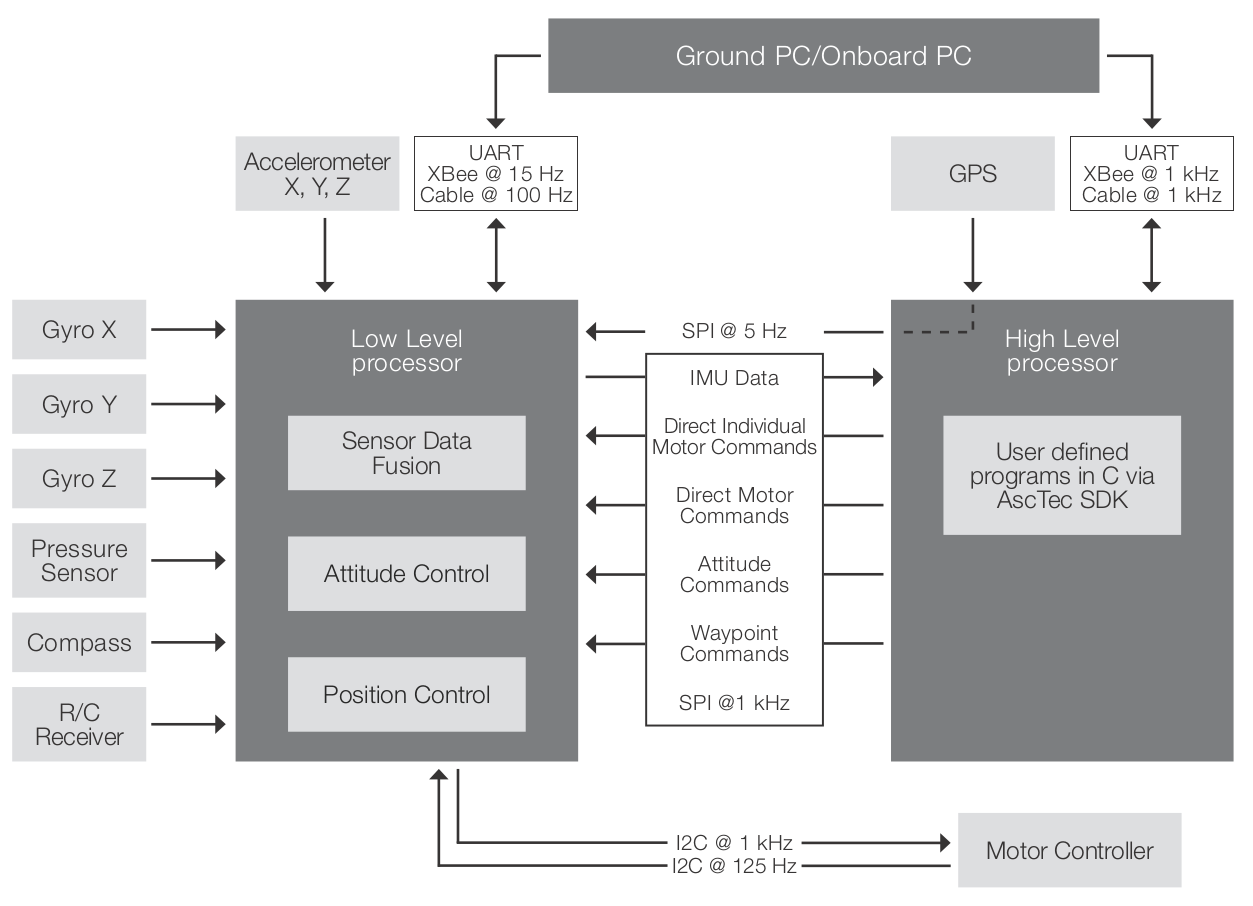 As show all the data is acquired by the low level procesor and sent to the high level processor.
Internal sensors
The first way to control the Pelican is to use it's own sensors, it's also the easiest way. To not get lost in all the files availables in the SDK you will have to use only sdk.c and sdk.h (only to understand functions and from where everything comes).
A mainloop in the main.c do the initialization and call the mainloop of the sdk.c that will execute your code (Note : to run it, you will need to activate it with the controler, G switch up in your direction and bring the stick left to the bottom right).
Few exemples are given in sdk.c mostly using GPS to deal with altitude.
Quick exemples
void SDK_EXAMPLE_POSITION(void)
{
    WO_SDK.ctrl_mode=0x00;    //0x00: direct individual motor control: individual commands for motors 0..3
                            //0x01: direct motor control using standard output mapping: commands are interpreted as pitch, roll, yaw and thrust inputs; no attitude controller active
                            //0x02: attitude and throttle control: commands are input for standard attitude controller
                            //0x03: GPS waypoint control

    WO_SDK.ctrl_enabled=1;  //0: disable control by HL processor
                            //1: enable control by HL processor

    //scale throttle stick to [0..200] and map it to all motors
        WO_Direct_Individual_Motor_Control.motor[0]=0;
        WO_Direct_Individual_Motor_Control.motor[1]=0;
        WO_Direct_Individual_Motor_Control.motor[2]=0;

    if(RO_ALL_Data.angle_pitch>10000){
        WO_Direct_Individual_Motor_Control.motor[3]=150;
    }
    else if(RO_ALL_Data.angle_pitch<-10000){
        WO_Direct_Individual_Motor_Control.motor[3]=50;
    }
    else WO_Direct_Individual_Motor_Control.motor[3]=100;
}
This exemple will change the speed of the motor 3 in function of the angle pitch (Note : for the firefly only the number of motors would change from 0..3 to 0..5.).
We first set the type of control we are going to do, here it's a direct individual control. After we allow the control by the High Level processor, set to 0 others motors(facultative) and finally our tests with the set of the motor commands.
The following example is directly given from the SDK, on this one we check the good control and also the access to the data from the controler.
int SDK_EXAMPLE_turn_motors_on(void) //hold throttle stick down and yaw stick fully left to turn motors on
{
    static int timeout=0;

    WO_SDK.ctrl_mode=0x02;    //0x00: direct individual motor control: individual commands for motors 0..3
                            //0x01: direct motor control using standard output mapping: commands are interpreted as pitch, roll, yaw and thrust inputs; no attitude controller active
                            //0x02: attitude and throttle control: commands are input for standard attitude controller
                            //0x03: GPS waypoint control

    WO_SDK.ctrl_enabled=1;  //0: disable control by HL processor
                            //1: enable control by HL processor

    WO_SDK.disable_motor_onoff_by_stick=0; //make sure stick command is accepted

    if(++timeout>=1000)
    {
        timeout=0;
        return(1); //1 => start sequence completed => motors running => user can stop calling this function
    }
    else if(timeout>500) //neutral stick command for 500 ms
    {
        WO_CTRL_Input.ctrl=0x0C;    //0x0C: enable throttle control and yaw control
        WO_CTRL_Input.thrust=0;
        WO_CTRL_Input.yaw=0;
        return(0);
    }
    else //hold stick command for 500 ms
    {
        WO_CTRL_Input.ctrl=0x0C;    //0x0C: enable throttle control and yaw control
        WO_CTRL_Input.thrust=0;
        WO_CTRL_Input.yaw=-2047;
        return(0);
    }

}
As previously stated you can find all the informations on the datas, their type, structures, values here.
Vicon sensors via ROS
The distribution installed on the Pelican is ROS Jade and you can issues due to the lack of support.
To fly by using ROS a framework is made available by the ASL of the ETH Zurich. The interface package will be the one interresting us the most. It will communicate to the HLP the data from the VICON by subscribing to different ROS topics.
They also adapted the firmware to update datas received by ROS.
TODO
Instruction and dependences to install are given but updates and other dependences not specified may be required.
Note : if the compilation fail for "mavmsgs/RollPitchYawrateThrust.h: No such file or directory" add to your sources mav_comm
Compile and transfer
Complete explaination of setup and use are given here.
Compile on Eclipse
Once the SDK imported and your IDE configured you can simply compile by using make or "build the project" on it's interface.
Transfer the new version
As explained the normal use require to plug the JTAG/USB connector. Turn on the Pelican and check the good detection with :
wayne@asctec:~/AutoPilot_HL_SDK$ ls /dev/ttyUSB*
/dev/ttyUSB0
Next start the connection with :
wayne@asctec:~/AutoPilot_HL_SDK$ sudo openocd -f lpc2xxx_asctecusbjtag05.cfg
Open On-Chip Debugger 0.5.0 (2011-08-26-10:27)
Licensed under GNU GPL v2
For bug reports, read
 http://openocd.berlios.de/doc/doxygen/bugs.html
Info : only one transport option; autoselect 'jtag'
5 kHz
RCLK - adaptive
adapter_nsrst_delay: 200
jtag_ntrst_delay: 200
trst_and_srst srst_pulls_trst srst_gates_jtag trst_push_pull srst_open_drain
fast memory access is enabled
dcc downloads are enabled
Info : RCLK (adaptive clock speed) not supported - fallback to 500 kHz
Info : JTAG tap: lpc2148.cpu tap/device found: 0x4f1f0f0f (mfg: 0x787, part: 0xf1f0, ver: 0x4)
Info : Embedded ICE version 4
Info : lpc2148.cpu: hardware has 2 breakpoint/watchpoint units
In an other terminal open a telnet connection.
wayne@asctec:~$ telnet localhost 4444
Trying 127.0.0.1...
Connected to localhost.
Escape character is '^]'.
Open On-Chip Debugger
>
This terminal will allow you to start, stop and televerse the new version of your compiled code.
reset halt
Will stop the Pelican.
flash write_image erase main.bin
Will flash the HLP with your new binaries.
reset run
Will restart the Pelican.